Today we’re going to learn how to play an arpeggio using two handed tapping. We’ll focus on Dm7 and go over some ways of practicing it. Then we’ll look at how to start using it to improvise over a backing track. The aim is to get to a point where you can play the arpeggio fast and cleanly.
However you also want to be able to use it melodically. Once you get to grips with it you will be able to incorporate tapped arpeggios into your playing. Then you can mix it with other techniques too.
D Minor 7
Below is a diagram of the pattern we will be using. Remeber you can move this up and down the fretboard to get different m7 chord arpeggios. For example playing it starting at the 7th fret would give you Em7.
Its important to understand which notes make up the chord and what the intervals between them are. Once you understand this it will be easier to move the chord around the neck. This will allow you to play inversions of it.
D minor 7 is made up of the following notes:
D – F – A – C
We have a Root, minor third, perfect fifth and a mionor seventh.
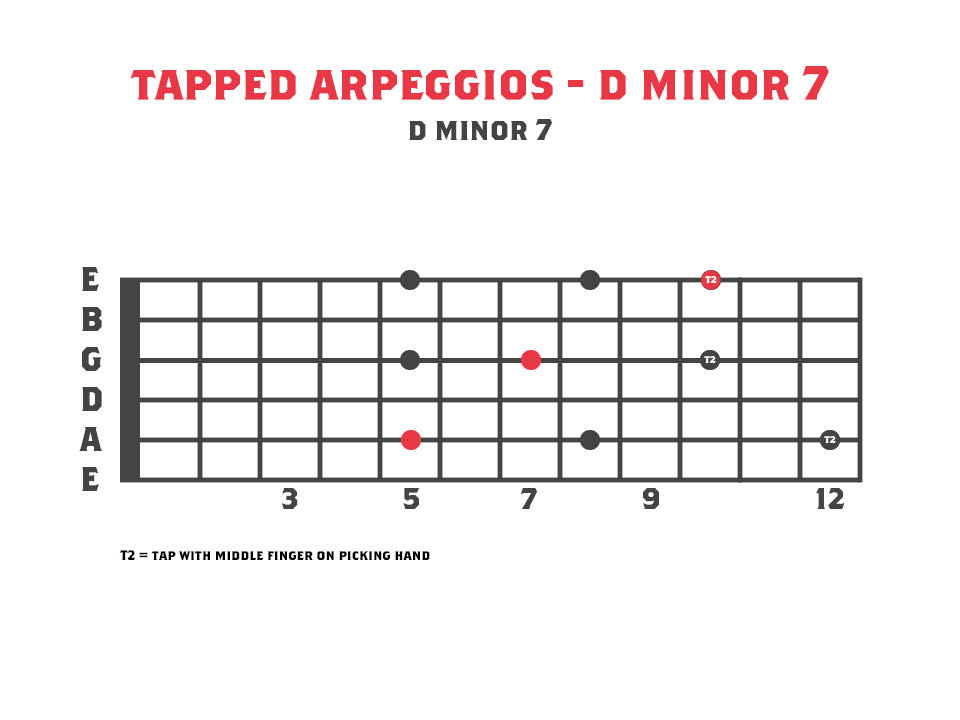
Starting from the fifth fret A string we have the root note, D. Then the 3rd, F and the 5th, A. On the G string we have the 7th, C and then we’re back to the root.
As you can see there is a minor 3rd between the D and F. There’s a Major 3rd between the F and the A (The m3 and 5th of the chord). Between the 5th, A and m7, C, there is a minor 3rd interval. You can see this on the high E string between the fifth and eighth frets.
Playing The Tapped Arpeggios
The arpeggio starts with a “hammer on from nowhere”. This means hammering on with the index finger of your fretting hand to get the note without picking. Next hammer on with your pinky to the eighth fret A string. Then tap the twelfth fret with your picking hand. You can use any finger for the tapping but I use my middle finger. This allows me to still hold a pick between my index finger and thumb.
From here we repeat the same technique but on the G string. Hammer on with your index finger on the fifth fret and then hammer the seventh fret with your ring finger. Then tap with the picking hand on the tenth fret.
Finally we reapeat the same techniques a third time on the high E string. Then play the whole lot in reverse to descend back down to the A string using pull offs this time.
How To Practice Tapped Arpeggios
In order to practice this I recommend breaking it down until you are comfortable with each part. First just play the notes on the A string until you get the hang of the technique. Practice each string as a separate part.
Step two is to combine two strings. First we’ll do the A and G string parts, so play all the notes on the A string. Next play the ones on the G string. Then start again so you are ascending but not descending. See the video above if you are unsure. After you get the hang of that you can start playing the same thing but descending the notes as well. Starting from the fifth fret A string all the way to the tenth fret G string. Then back down to the fifth fret A string.
Finally you are ready to play the whole thing ascending up to the tenth fret E string. Then move back down to the fifth fret A string. Check out the video above! There are more tips and ideas on how to practice tapped arpeggios to make it more fun!
Working Out Inversions
Since we know the intervals between each note we can use this knowledge to play inversions of the arpeggio. This will open up different positions on the neck. An inversion is where you play a chord or arpeggio with a note other than the root in the bass. For example having the 3rd as the lowest note.
Check out the diagram below showing the intervals in our arpeggio. As long as you know which note you are playing you can work out where the next one will be. For example, play the 5th of the arpeggio, A. You know the m7 will be three frets higher (a m3 interval):
| First Note: | Second Note: | Interval between them: |
| D (Root) | F (m3) | minor third |
| F (m3) | A (5) | Major third |
| A (5) | C (m7) | minor third |
| C (m7) | D (Root) | Whole tone |
Using a Related Scale For Improvisation
Once you get the hang of playing the arpeggio we can start to utilise other notes from a related scale. This will help you to come up with melodic ideas when improvising over a backing track.
If we take notes from the D minor scale we can add these in when we are playing the arpeggio. Try using a variety of tapping, hammer ons and pull offs and slides. See the video for an example of this.
The diagram below shows the Arpeggio shape for Dm7 with notes from the D natural minor scale superimposed over it.
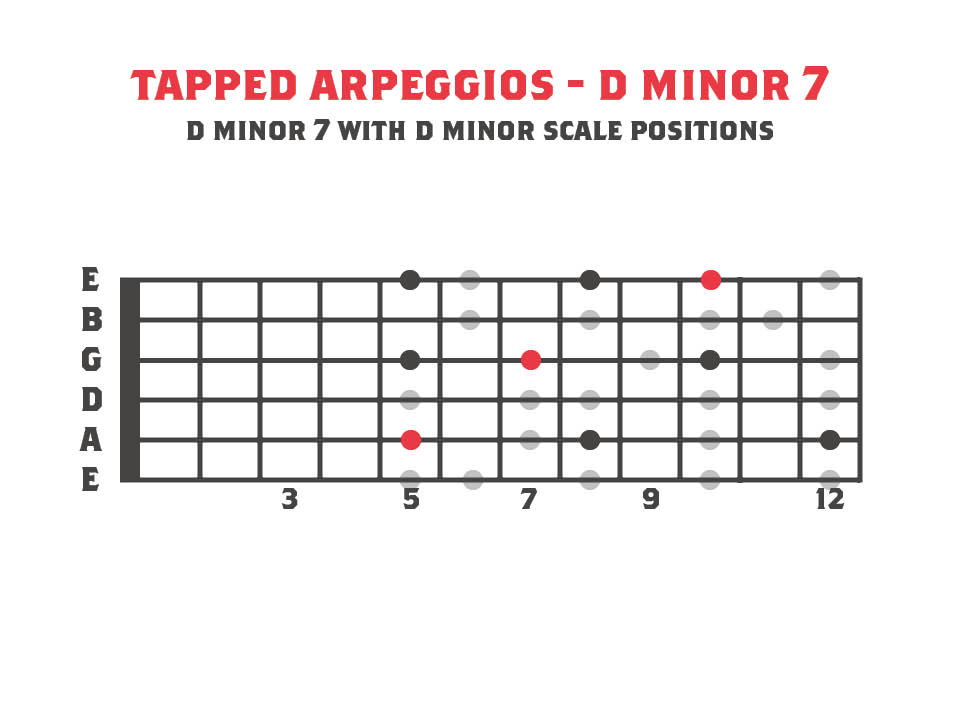
Try practicing the arpeggio over a backing track in the key of D minor or a related mode. You can use all the notes from the diagram above.
For example you could tap through the arpeggio up to the tenth fret E string. Then slide to the twelth fret and then descend the arpeggio. Effectively this would extend the Dm7 arpeggio to a Dm9.
Patreon members will have access to the backing track from the video – Click Here.
That’s it for this lesson! Remember you can use the same ideas to practice other arpeggio shapes too. Try it with a Major 7 chord arpeggio or if you’re feeling confident a minor seven flat five (m7b5)! Have fun with it and remember to take your time and practice slowly!




No Comment