Welcome back! We’re going to look at a cool Arpeggio Sequence using B minor and A Major with some additional scale extensions. We’ll go over the shapes & positions, how to play it, and how to develop speed and accuracy.
We’ll throw in an inversion of Bm too for a bit of fun and extend the arpeggios to Bm(add11) and AMaj(add11). This arpeggio sequence is good for people who are new to sweeping. It will help you to get used to, and develop the technique. However its also fun to play really fast so if you’re already a good sweeper you may still enjoy this one!
The arpeggios are all 3 and 5 string patterns, however we’ll add a little end riff for 8 string. If you play a 6 or 7 string don’t worry, we’ll look at a couple of alternative “endings” too.
Check out the video below:
Arpeggio Sequence – Diagrams
Lets look at the diagrams for each Arpeggio.
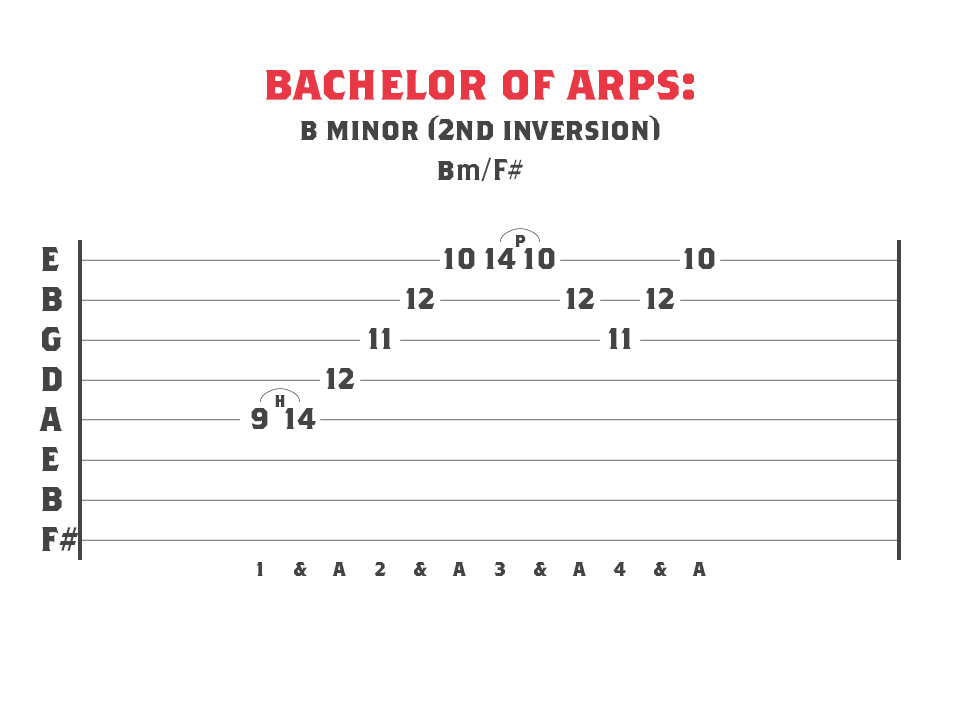
Bm/F#
We’re going to start with an inversion. This is when you play a chord or Arpeggio stating from a note other than the Root. Sometimes these are called “Slash” chords. This is because we write the name of the chord followed by a forward slash and then the note we are using as the bass note (lowest pitch). In this instance Bm is made up of:
B – D – F#
We’re going to play it in second inversion which means placing the fifth in the bass, this is the note F#. So Bm/F# is just Bm but with F# as the lowest pitch:
F# – B – D
We’re going to sweep up the arpeggio starting from fret 9 on the A string. Then we’ll decend halfway, to the G string and then ascend again. We’ll be repeating this pattern of ascending and descending on some of the other arpeggios too. If you’re not sure what I mean check out the tab further down. Patreon members will have access to a .pdf tab book and Guitar Pro files for Guitar Pro 6 and 7.
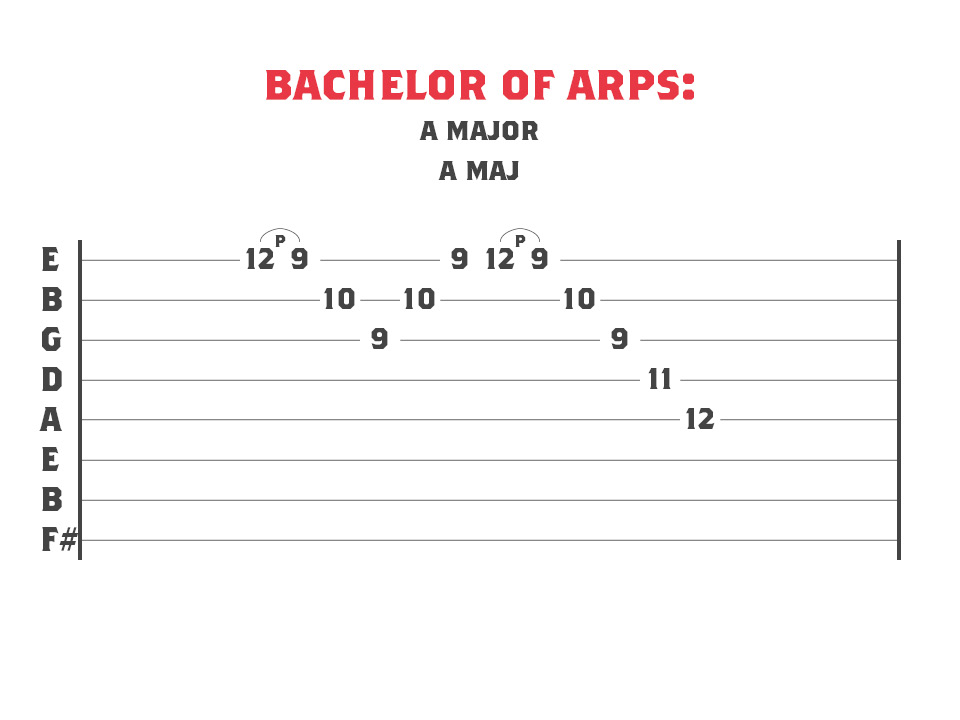
A Maj
Next up we have A Major. This chord/arpeggio has the following notes:
A – C# – E
Since we ended the last arpeggio on the high E string we will be starting from there for this one and descending. We’re going to descend halfway to the G string and then back up. Then descend all the way down to the A string.
Bm
Now we’re going to shift up to B minor again. This time we’re starting from the Root note, not the fifth.
Since we “lost” a note at the beginning compared the the inversion we played at the start we’ll add a note to the end. This will be a tapped Root note using your picking hand. Unlike the last two arpeggios we will ascend all the way to the tapped note. Then descend all the way back down to the m3 on the D string. Then the next shape will start from the Root note on the A string…
Bm (Add 11)
Now for a scary sounding arpeggio! Beginners are often put off when they hear “9”, “11”, or “13” but don’t worry. All we’re doing here is adding in a note on the 12th fret high E string and removing the tapped note from earlier.
An 11th is the same as a 4th, but the name implies we’re playing it in a higher octave than the Root note. In Bm the 4th/11th is the note E.
We’ll ascend up to the high E string, after you pick the tenth fret hammer on to twelve. Next play fourteen and then pull off to ten again. Remember we’re only going to play that 11th as we ascend but not when we start to go back down. You’ll end up with too many notes and the timing of the sequence will be thrown off otherwise. Check out the tab below if you’re unsure.
Once again this pattern will be ascended all the way and then we’ll descend to the G string and then ascend again to the tenth fret high E string.
A Major (Add 11)
Now we’re going to do the same thing to our A Major chord arpeggio. By playing the tenth fret and pulling off to the ninth we have an 11th followed by the Maj 3rd. This time however we’re going to descend to the G string and then ascend back up. Play the 5th on the twelth fret this time and descend the whole thing back tho the A string. Check out the tab below or the video to see how this sounds.
The Sequence
The diagrams above show the arpeggio shapes in order. However the tab below will help to make the sequence of notes more clear. From there we will slide up into a short ending lick (see below).
Arpeggio Sequence – Tab
Here is the tab for how to play the whole sequence. Afterwards we’ll discuss a few options for ending the sequence.
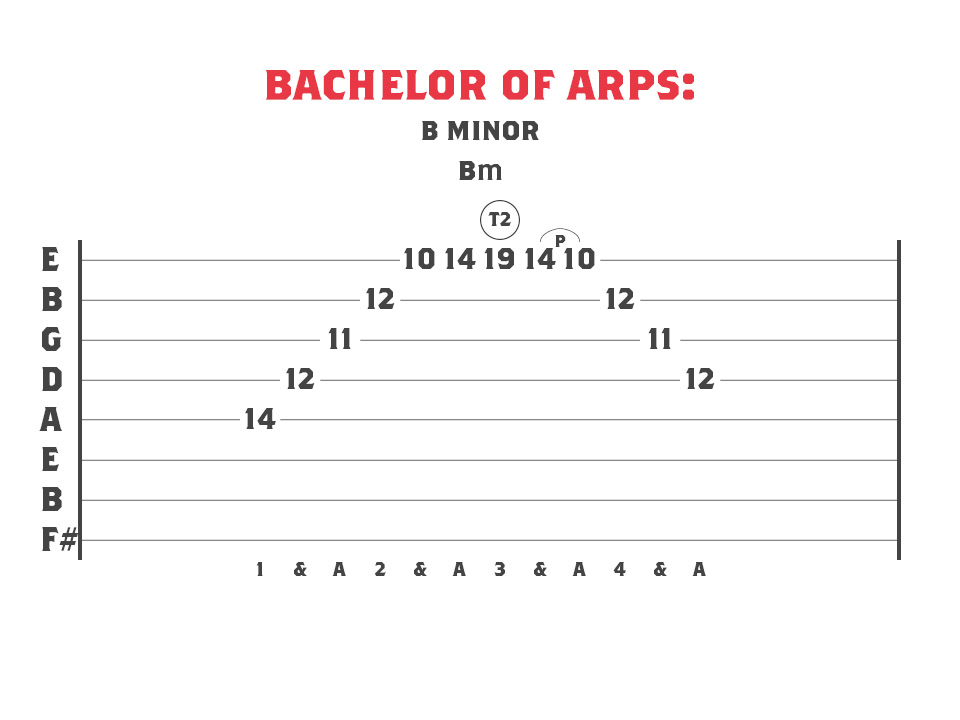
Here we’re adding a tapped note with our picking hand on the 19th fret. This still gives us a Bm arpeggio but now in Root position with a root note on top. Slight alterations like this can make an arpeggio sequence more interesting.
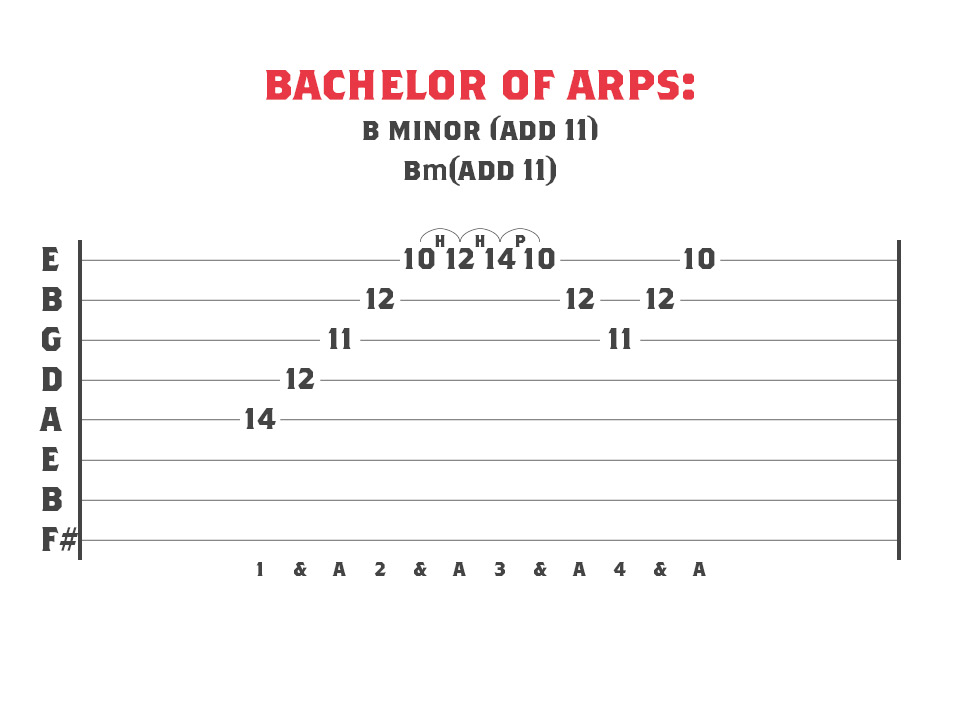
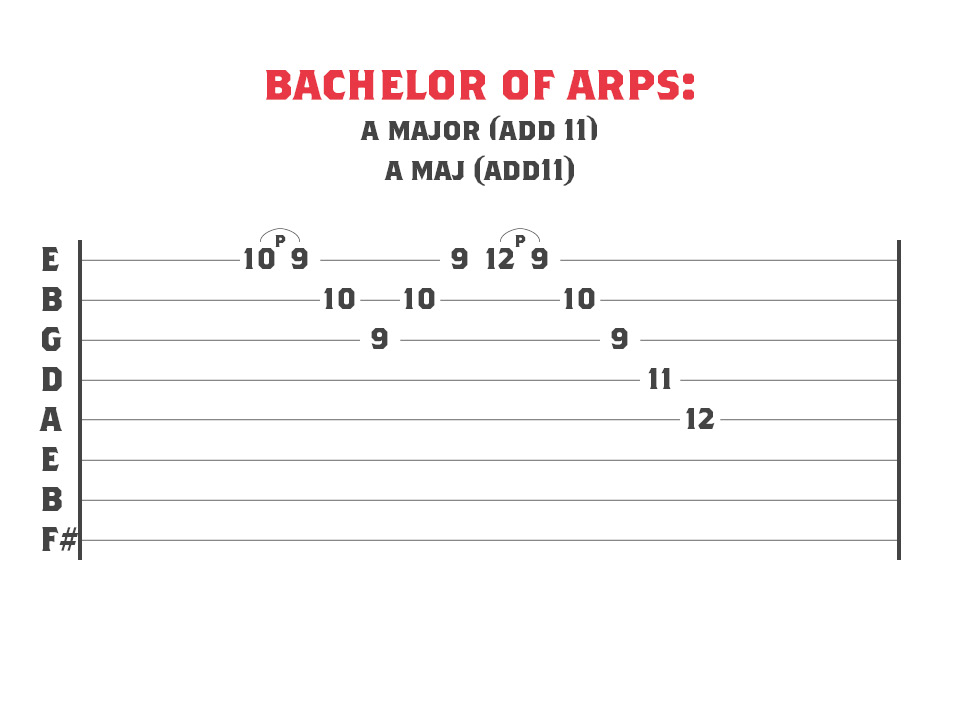
We’re only adding the A Major (add 11) to the three string part of this and then reverting to a standars A Major for the five string part.
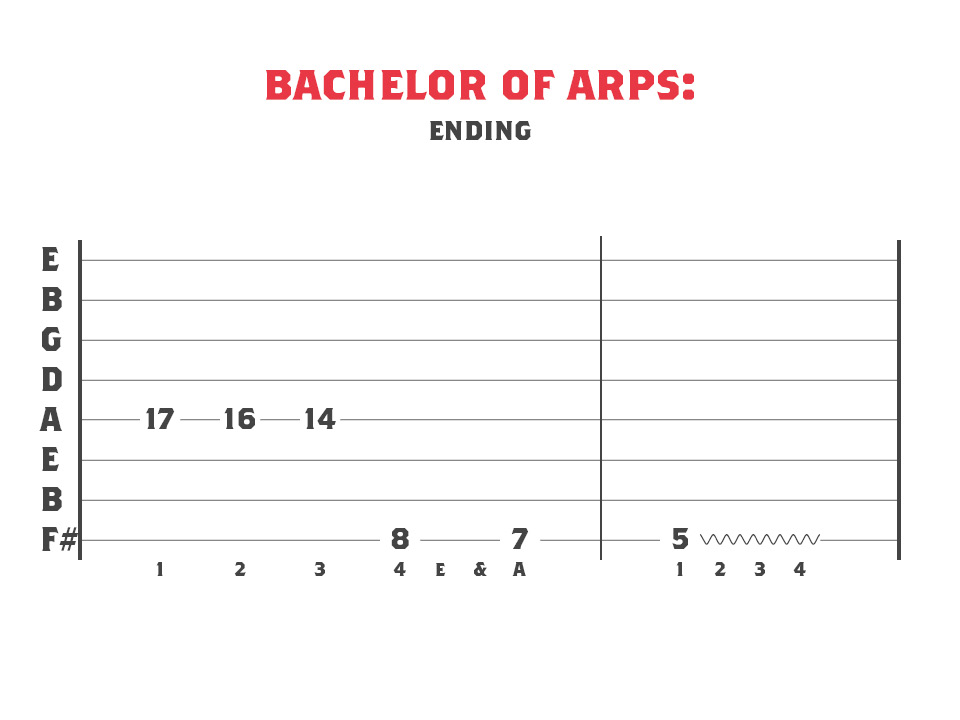
For the ending I have slid up from the twelth fret A string to the seventeenth fret. This is the note D. Since we only have two chords in this sequence, the key is not immediately obvious. Both of the chords we have used occur in the key of A Major but also in the Key of D Major.
By playing the seventeenth, sixteenth and fourteenth frets I have still not defined the key as these notes are also all in both A Major and D Major. I’m then repeating the same notes in a lower octave on the low F# string. The notes are D, C# and B.
If you are playing a 7 string guitar you could play these notes on the third, second and open frets of the low B string.
If you are on a 6 string guitar you can play them an octave higher. This would be the tenth, ninth and seventh frets of the E string.
Either way we are finishing on the note B. If we think of our key as being A major then we could move in to a riff or lick using the B Dorian mode from here.
Alternatively if we decide to think of our key as being D Major then we could us the B Aeolian mode.
Developing speed and accuracy
Sweeping can be a very fun technique to use and you can get some crazy speed too! That being said you don’t have to always sweep at ultra high speed.
It makes sense to develop your speed though because this will allow you to play more easily at slower tempos. So even if you don’t plan to write music using fast arpeggios it will still be beneficial to practice your speed and accuracy.
To do this, as usual you need to start SLOWLY. Make sure you are playing with the correct timing. Check that you are muting the strings not being played. Strings lower in pitch than the one you are on can be muted with your picking hand. The string higher in pitch than the one you are on can be muted using your fret hand fingers. To do this make sure part of the finger which is fretting the note is touching the next string slightly too.
Remember when playing slowly that you need to use the same technique you would use to play fast. This is so that you develop muscle memory for the correct movements. This will mean you can play faster without having to think too much about where to move each muscle/tendon.
Build the speed up bit by bit and make sure your playing still sounds clean as you increase the tempo. If you start to get unwanted noise or are hitting wrong notes slow back down slightly and do more repetitions. Remember not to overdo it, take regular breaks to give your mind and body time to “digest” the movements. This will help to develop your speed.
Taking the Arpeggio Sequence Further
Once you get the hang of this sequence you can start to take things a bit further. Try re-arranging the shapes or repeating them in different ways. You could also start trying to write riffs that lead into the sequence. Alternatively try writing a rhythm section to come after the arpeggios. Remember we can view these as being in either B minor (Aeolian) or B Dorian so try different ideas using one of those modes to come up with riffs.
Above all enjoy playing around with these ideas and before you know it you’ll be coming up with sequences of your own to fit your own music.
See you next time!







No Comment